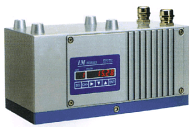
The IM series is an on-line multi IR wavelength analyzer utilizing infrared absorption technology for measuring product constituent and/or thickness. Signal processing capabilities are built into the compact, Stand-Alone detector unit for easy installation and operation. A maximum of 99 calibration curves can be stored into the detector memory for numerous measurement applications. The detector can be used by itself or connected to a PC/plant control system, as both analog and digital outputs are provided. A remote setting display unit, connectable up to 9 detector units, can be used to set various detecting parameters and also displays measured values.
| Up to 10 wavelengths, able to measure 4 constituents, moisture, film-thickness, organic properties, and coating-thickness in real time. |
| Communicate with multi interface, RS-485 (MODBUS), Ethernet (LAN) (option) |
| High-speed (28ms) & High-repeatability. |
| Multi-calculation function. |
| Self-diagnostic function, easy maintenance. |
| Conforms to CE standards. |
| Mirror Type | |
| Model | Specification |
| IRMA1100 | Universal moisture |
| IRMA1200 | High moisture |
| IRMA1300 | Micro moisture |
| IRMA51-- | Multi-component (NIR) |
| IRMA52-- | Multi-component (Thin-film, Infrared) |
| IRMA7100 | Thickness, coating (NIR) |
| IRMA7200 | Thickness, coating (Thin-film, Infrared) |
| Fiber Type | |
| IRMA2100 | Universal moisture |
| IRMA2200 | High moisture |
| IRMA61-- | Multi-component |
| IRMA8100 | Thickness, coating |
MULTI ANALYZER DETECTOR UNIT
| Measuring system | Infrared absorption type |
| Measuring wavelength | Up to 10 wavelengths |
| Measuring scope | Up to 4 constituents |
| Source of light | Tungsten lamp |
| Measuring distance and measuring diameter | ⬚30/200mm or ⬚50/300mm |
| Output signal |
1) Analog signal: 4 to 20mADC; ±0.2% of full scale (Load resistance: less than 500ï—) 2) Communications signal: RS-485 MODBUS (STD) 3) Ethernet (LAN) |
| Output renewal cycle | 28ms |
| Display & setting | LED display shows the measurement data and setting value. Various parameters are settable by keypad. |
| Computing function | Ratio calculation for 2-color or 3-color, and multiple regression calculation. |
| Calibration curve number | up to 99 curves |
| Calibration curve |
Linear, quadratic, cubic and multiple regression line. Calibration curve correction: Linear & quadratic |
| Smoothing | 0 to 99 seconds, optional setting |
| Calibration | By checking plate |
| Setting detector number | Use multi-head then set the detector number by keypad |
| Setting channel number | Set calibration curve number by keypad |
| Self-diagnostic function | Display and output alarm by digital communications and/or contact signal |
| Input correction | Corrects the measured data by external 4 to 20mA DC (1 input)(sample temperature correction, etc.) |
| External Di/o |
Di(contact input), selectable from preset, data-hold, real/ smooth functions. Do(contact output), selectable from self-diagnostic function (1b) or upper/ lower limit alarm (1a). |
| Ambient temperature range | 0 to 50 °C (air cooling is necessary for higher than 45°C) |
| Power supply | 24V DC |
| Power consumption | Approx. 30VA |
| Connection | Terminals connection |
| Casing | Aluminum casing. |
| Weight | Approx. 4.3kg |
| Mounting | Suspension the analyzer uses 4-M8 bolts. |
| CE-marking specifications | EN61326+A |
| SETTING DISPLAY UNIT |
| Analog output | RS-485, Connectable with max.9 detector units |
| Analog output |
1) Analog signal: 4 to 20mADC; 2 output* (Load resistance: less than 500ï—) * In the case of multi-head, output from No.1 and No.2 connected detectors. 2) Communications signal: specified from RS-232C, RS-422A or RS-485. |
| Output scaling | By numeric key |
| Output renewal cycle | Communications output: 28ms ´ detector number |
| Display |
1) Measured data, LED 5-digit 2) Head No., CH. No., parameter. |
| Setting detector number | Set detector head No.1 to No.9 by key |
| Setting channel number | Set calibration curve number by key |
| Smoothing time | T=0.1 to 99.9 seconds |
| Calibration | After output checking plate inserted, calibrate by key or external contact. |
| Hold/preset | Hold or preset the display and output by key or external contact. |
| Calibration curve correction | Corrects the calibration curve online or linear, quadratic correction. |
| External setting | Head number, CH. No., Calibration Hold, Preset. |
| Alarm function | Contact 1 output (HCL) outside of setting-range |
| Self-diagnostic | Contact 1 output |
| Power supply | 100 to 240V AC 50/60Hz |
| Power consumption | max. 15VA |
| Working ambient temperature | 0 to 50°C |
| Casing | ABS resin (IP65) |
| Mounting | Panel-mount type |
| Weight | Approx. 0.6kg |
| FIBER UNIT |
| Measuring distance and measuring diameter |
with lens: f25/25mm to f40/100mm without lens: f20/15mm to f50/50mm |
| Fiber length |
Standard 1.5m, Max.5m (Reflection type fiber) Standard 2m, Max.10m (Transmission type fiber) |
| Fiber protection | Stainless steel snake tube |
| Minimum bending radius | R100mm |
| Working temperature range | 0 to 150°C |
| Purge air flow |
with lens: non air purge without lens: 5 to 20NL/min |
| Accessory | Vertical mounting holder, Flange holder |
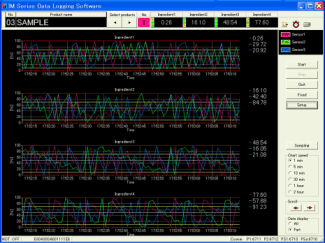
Main Screen
Displays measured data, trend and alarm value. Displays 4 constituents on one screen. Save data into specified folder, enable to search or read historical data.

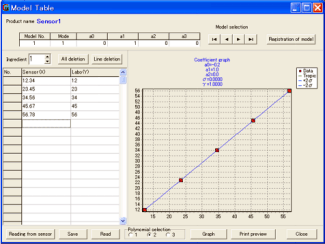
Create the Calibration Curve
Creates the calibration curve for new sample, and transmits the calibration curve data to detector.

| Performance Specification Sheet | Infrared Multi Analyzer | IM Series | Download |